Last year my son had a culture day assignment where he wrote on our family Mexican heritage, he made a paper Mexican doll, and he could bring in a treat to share with his class.  I decided to make buñuelo’s for him to bring in.  

My grandmother and my mom make "real" buñuelo’s with homemade tortilla dough and they are delicious.  I decided to take the easier route and use store bought flour tortillas, they still turned out super yummy, especially for my kids who love Taco Bell Cinnamon Twists, lol.
  
This is a fun treat to have anytime, but with Cinco de Mayo right around the corner I thought I'd share, these would be easy to serve at a Cinco de Mayo party or Mexican dinner theme night for your family, make these as dessert on your next Taco Tuesday.

Ingredients:
12 Flour Tortillas
1 teaspoon Cinnamon
1/2 cup of Sugar
Canola Oil 

Directions:
Cut your tortillas to desired shape, I normally do triangles.  You could use cookie cutters or do strips.

Mix together the cinnamon and sugar in a small bowl.

Heat your oil to fry the tortillas, you can use a wooden spoon placed in the hot oil once bubbles start to form around the wooden spoon it's ready to go, or dip a tortilla in and look for those bubbles.  You do not want your oil too hot, during the process if you notice the tortillas are browning too quickly lower the heat gradually.

Once light and golden brown transfer to a paper towel to drain off excess oil, sprinkle both sides with cinnamon and sugar mixture while warm.  Coat and serve.  

These are best served warm.  If you need to make ahead of time, just re-warm them in the oven, but not too long, don't use the microwave, or they will not be as crispy.  

If you want to take these up notch, you can serve with vanilla ice cream and strawberries or serve with a maple syrup mixed with caramel sauce, or drizzled with honey, oh my goodness!


Thank you for reading if you’ve enjoyed the content you’ve read above please share with your friends. 


Easy Mexican Buñuelo Recipe

Last year my son had a culture day assignment where he wrote on our family Mexican heritage, he made a paper Mexican doll, and he could bring in a treat to share with his class.  I decided to make buñuelo’s for him to bring in.  

My grandmother and my mom make "real" buñuelo’s with homemade tortilla dough and they are delicious.  I decided to take the easier route and use store bought flour tortillas, they still turned out super yummy, especially for my kids who love Taco Bell Cinnamon Twists, lol.
  
This is a fun treat to have anytime, but with Cinco de Mayo right around the corner I thought I'd share, these would be easy to serve at a Cinco de Mayo party or Mexican dinner theme night for your family, make these as dessert on your next Taco Tuesday.

Ingredients:
12 Flour Tortillas
1 teaspoon Cinnamon
1/2 cup of Sugar
Canola Oil 

Directions:
Cut your tortillas to desired shape, I normally do triangles.  You could use cookie cutters or do strips.

Mix together the cinnamon and sugar in a small bowl.

Heat your oil to fry the tortillas, you can use a wooden spoon placed in the hot oil once bubbles start to form around the wooden spoon it's ready to go, or dip a tortilla in and look for those bubbles.  You do not want your oil too hot, during the process if you notice the tortillas are browning too quickly lower the heat gradually.

Once light and golden brown transfer to a paper towel to drain off excess oil, sprinkle both sides with cinnamon and sugar mixture while warm.  Coat and serve.  

These are best served warm.  If you need to make ahead of time, just re-warm them in the oven, but not too long, don't use the microwave, or they will not be as crispy.  

If you want to take these up notch, you can serve with vanilla ice cream and strawberries or serve with a maple syrup mixed with caramel sauce, or drizzled with honey, oh my goodness!


Thank you for reading if you’ve enjoyed the content you’ve read above please share with your friends. 


         'May the 4th Be With You' FREE Family Fun Event!
'May the 4th Be With You' is a Family Friendly Star Wars inspired community event. Attendees will enjoy an action packed 'Star' studded light saber show, Star Wars themed activities and games, kid friendly snack bar, Lego Star Wars movie on HD theater style BIG screens, and more! 

Since 1977 we have been entertained, captivated and energized by the epic space opera film known as Star Wars.  Multitudes of fans have seen any one of the classics multiple times.  The attraction has not diminished and, in fact, continues to increase as grandparents and parents pass on the love to children and grandchildren.

A community-focused church, Family Community Church, in North Highlands, CA, understands the attraction and is doing its part to continue the Star Wars saga in a fun and family friendly environment.   
For over 30 years this organization has demonstrated a deep passion for improving the quality of life for people in the community by creating events and opportunities to bring families, businesses, schools and organizations together.  Some of their biggest successes have been with carnivals, community clean- ups, parades, parking lot sales, car washes and more. 

For additional information, feel free to call (916) 334-7700, or visit www.FamilyCC.org.
When:   May 4, 2017
Time:     5:00pm - 7:00pm 
Where:  Family Community Church, 6331 Watt Avenue, N. Highlands, CA
My family is looking forward to this community event, my boys are huge Star Wars fans, we hope to see you there!

Thank you for reading if you’ve enjoyed the content you’ve read above please share with your friends. 

"May the Fourth be with You." FREE Family Fun Event!


         'May the 4th Be With You' FREE Family Fun Event!
'May the 4th Be With You' is a Family Friendly Star Wars inspired community event. Attendees will enjoy an action packed 'Star' studded light saber show, Star Wars themed activities and games, kid friendly snack bar, Lego Star Wars movie on HD theater style BIG screens, and more! 

Since 1977 we have been entertained, captivated and energized by the epic space opera film known as Star Wars.  Multitudes of fans have seen any one of the classics multiple times.  The attraction has not diminished and, in fact, continues to increase as grandparents and parents pass on the love to children and grandchildren.

A community-focused church, Family Community Church, in North Highlands, CA, understands the attraction and is doing its part to continue the Star Wars saga in a fun and family friendly environment.   
For over 30 years this organization has demonstrated a deep passion for improving the quality of life for people in the community by creating events and opportunities to bring families, businesses, schools and organizations together.  Some of their biggest successes have been with carnivals, community clean- ups, parades, parking lot sales, car washes and more. 

For additional information, feel free to call (916) 334-7700, or visit www.FamilyCC.org.
When:   May 4, 2017
Time:     5:00pm - 7:00pm 
Where:  Family Community Church, 6331 Watt Avenue, N. Highlands, CA
My family is looking forward to this community event, my boys are huge Star Wars fans, we hope to see you there!

Thank you for reading if you’ve enjoyed the content you’ve read above please share with your friends. 
National Teacher Appreciation Day is Tuesday of the first full week in May, the entire week is celebrated as Teacher Appreciation Week.  This year that is May 1st through May 5th.

I encourage you to plan with your children to do something special for their teachers.  It takes a special person to be a teacher.  In my opinion they have one of the toughest and underpaid jobs.  I think it is important not only to honor and show appreciation for their investment in our children, but to also teach our children to appreciate and be grateful for the gift teachers are.  

I understand with multiple children and other holidays or birthdays in May it can be expensive.  It would be a good thing to plan and budget ahead of time to bless your children's teachers.  Even if you have not planned properly for this year, your gift does not have to be elaborate, It can be as simple as a hand written thank you card or if you know what they like for example their favorite coffee shop or favorite restaurant you could bless them with a gift card.  One year I made a basket with a "summer theme".  The basket was orange for sunshine, and I tried to fill it with orange things (orange gum, orange sunscreen, orange candy, orange soda, and I used things from my coupon stock pile to add to it (lotion, nail polish, sticky notes, nice pens, and tea) and it turned out really cute.  I printed out a Teacher Poem "Why God Made Teachers") and glued it to pretty card-stock.  It was inexpensive, but thoughtful.

I know you will find posts on-line about how teachers do not want another mug or handmade gift, which I understand but at the same time, I know many teachers and they are grateful that you took the time and made the effort to appreciate them.    

Last year I searched on Pinterest for Teacher Appreciation Gift Ideas and there were a ton of cute ideas.  This one in particular stood out to me a "Crayon Wreath".  There were a number of different styles and shapes.  I headed out to my local craft store and gathered my supplies.  These crayon wreaths turned out super cute and I want to share mine with you.

Crayon Wreath

Supplies Needed:
Liquid Fusion (found at Michael's)
Hot Glue Gun
Crayons (I used 3 boxes)--It did not fill the entire wreath, at the bottom I used pencils, crayon box, & decorations to fill.
Unfinished Wooden Wreath (Found mine at Michael's near the foam for flowers)
Ribbon (I used chalkboard ribbon from Michael's)
Decorations to add to it (pencils, wooden apple, mini chalkboard)

Directions:
First you want to glue the crayons to the wooden wreath using liquid fusion and your hot glue gun.  I put the liquid fusion on first, to help make sure everything stayed, and then small amount of hot glue for each crayon, then place the crayon one at a time and hold for a few seconds.  You don't want your glue gun too hot, or the crayon will melt.  Once you get the hang of it, you can use enough hot glue to place 2-3 crayons at a time.  

I arranged my colors near the same color, all the pinks, reds, together.  You can do a mixture if you want. You need to fan out your crayons a little towards the tips.  I did a practice run with no glue first to get the idea of how I would fan them out.  It does not have to be perfect though, if you have a little spacing issue, you can use the decorations or even ribbon to help hide those.

Once the crayons are dry, you can add additional decorations, you could use a ruler, mini chalkboard and apple, you can find these at the craft store as well.  You could even use the empty crayon box, I did.  I used an owl on one teacher's because her class was called "Wise Owls".  

Then glue the ribbon to the back of the wreath so it can hang, you could also make a bow, I am not the best bow maker so I did not make a bow on mine.


Need more teacher gift ideas, check these out:  


Thank you for reading if you’ve enjoyed the content you’ve read above please share with your friends. 

National Teacher Appreciation Day - DIY Crayon Wreath

National Teacher Appreciation Day is Tuesday of the first full week in May, the entire week is celebrated as Teacher Appreciation Week.  This year that is May 1st through May 5th.

I encourage you to plan with your children to do something special for their teachers.  It takes a special person to be a teacher.  In my opinion they have one of the toughest and underpaid jobs.  I think it is important not only to honor and show appreciation for their investment in our children, but to also teach our children to appreciate and be grateful for the gift teachers are.  

I understand with multiple children and other holidays or birthdays in May it can be expensive.  It would be a good thing to plan and budget ahead of time to bless your children's teachers.  Even if you have not planned properly for this year, your gift does not have to be elaborate, It can be as simple as a hand written thank you card or if you know what they like for example their favorite coffee shop or favorite restaurant you could bless them with a gift card.  One year I made a basket with a "summer theme".  The basket was orange for sunshine, and I tried to fill it with orange things (orange gum, orange sunscreen, orange candy, orange soda, and I used things from my coupon stock pile to add to it (lotion, nail polish, sticky notes, nice pens, and tea) and it turned out really cute.  I printed out a Teacher Poem "Why God Made Teachers") and glued it to pretty card-stock.  It was inexpensive, but thoughtful.

I know you will find posts on-line about how teachers do not want another mug or handmade gift, which I understand but at the same time, I know many teachers and they are grateful that you took the time and made the effort to appreciate them.    

Last year I searched on Pinterest for Teacher Appreciation Gift Ideas and there were a ton of cute ideas.  This one in particular stood out to me a "Crayon Wreath".  There were a number of different styles and shapes.  I headed out to my local craft store and gathered my supplies.  These crayon wreaths turned out super cute and I want to share mine with you.

Crayon Wreath

Supplies Needed:
Liquid Fusion (found at Michael's)
Hot Glue Gun
Crayons (I used 3 boxes)--It did not fill the entire wreath, at the bottom I used pencils, crayon box, & decorations to fill.
Unfinished Wooden Wreath (Found mine at Michael's near the foam for flowers)
Ribbon (I used chalkboard ribbon from Michael's)
Decorations to add to it (pencils, wooden apple, mini chalkboard)

Directions:
First you want to glue the crayons to the wooden wreath using liquid fusion and your hot glue gun.  I put the liquid fusion on first, to help make sure everything stayed, and then small amount of hot glue for each crayon, then place the crayon one at a time and hold for a few seconds.  You don't want your glue gun too hot, or the crayon will melt.  Once you get the hang of it, you can use enough hot glue to place 2-3 crayons at a time.  

I arranged my colors near the same color, all the pinks, reds, together.  You can do a mixture if you want. You need to fan out your crayons a little towards the tips.  I did a practice run with no glue first to get the idea of how I would fan them out.  It does not have to be perfect though, if you have a little spacing issue, you can use the decorations or even ribbon to help hide those.

Once the crayons are dry, you can add additional decorations, you could use a ruler, mini chalkboard and apple, you can find these at the craft store as well.  You could even use the empty crayon box, I did.  I used an owl on one teacher's because her class was called "Wise Owls".  

Then glue the ribbon to the back of the wreath so it can hang, you could also make a bow, I am not the best bow maker so I did not make a bow on mine.


Need more teacher gift ideas, check these out:  


Thank you for reading if you’ve enjoyed the content you’ve read above please share with your friends. 
The 2017 Celebrate the Earth Festival arrives Saturday, April 22, 2017 at Mahany Regional Park in Roseville—and it's their 10th Anniversary! 

This is one of our family's favorite Earth Day Festival's, we look forward to attending every year.  They have hands on interactive activities for the entire family.  Many vendors have give-a-ways, learning demonstrations and so much more. My boys love the live animals they have out there. 

There is entertainment for the entire family.  This year's main stage entertainment will include live music from Ant Bee (front porch rock), animal shows from Wild Things,  and fun with Mad Science. More entertainment around the festival included free face painting and demonstrations from Roseville PD's K-9 units.


There are food trucks available with yummy treats.  This year you can look forward to Kazoku Teriyaki and Shaved ice, Dave's Dawgs and many more of Sacto Mofo food trucks.


If you live near Mahany Park, riding your bike is a great way to get to the Festival. A free secure bike parking corral is available, no locks required. All bicyclists will receive a free bike-related giveaway! Or, get your neighbors and friends together and carpool.   Mahany Park is located at 1501 Pleasant Grove Blvd.


Travel FREE on Roseville Transit in honor of Earth Day (valid on Local routes only). Routes D and M take you to the event. Call 745-7560 for bus trip planning assistance or visit www.roseville.ca.us/transit. 


Join their Scavenger Hunt!  Download the free Scavify app for Android or iOS, then enter the "RosevilleEarth" hunt to join in the fun! Answer eco-friendly trivia, capture pictures as part of the photo hunt, and compete for fantastic prizes. 

A couple of years ago, our family was photographed at the Earth Day Festival and our photo was used on their social media and a local magazine, we thought that was pretty neat.  A friend of ours actually saw our picture in the magazine and that's how we found out. 

Here are some pictures from previous years of our family at the Celebrate the Earth Festival.  I hope you are able to go out and enjoy all the free family fun!  Saturday, April 22, 2017.

Thank you for reading if you’ve enjoyed the content you’ve read above please share with your friends. 


Celebrate Earth Day Festival-Roseville, CA

The 2017 Celebrate the Earth Festival arrives Saturday, April 22, 2017 at Mahany Regional Park in Roseville—and it's their 10th Anniversary! 

This is one of our family's favorite Earth Day Festival's, we look forward to attending every year.  They have hands on interactive activities for the entire family.  Many vendors have give-a-ways, learning demonstrations and so much more. My boys love the live animals they have out there. 

There is entertainment for the entire family.  This year's main stage entertainment will include live music from Ant Bee (front porch rock), animal shows from Wild Things,  and fun with Mad Science. More entertainment around the festival included free face painting and demonstrations from Roseville PD's K-9 units.


There are food trucks available with yummy treats.  This year you can look forward to Kazoku Teriyaki and Shaved ice, Dave's Dawgs and many more of Sacto Mofo food trucks.


If you live near Mahany Park, riding your bike is a great way to get to the Festival. A free secure bike parking corral is available, no locks required. All bicyclists will receive a free bike-related giveaway! Or, get your neighbors and friends together and carpool.   Mahany Park is located at 1501 Pleasant Grove Blvd.


Travel FREE on Roseville Transit in honor of Earth Day (valid on Local routes only). Routes D and M take you to the event. Call 745-7560 for bus trip planning assistance or visit www.roseville.ca.us/transit. 


Join their Scavenger Hunt!  Download the free Scavify app for Android or iOS, then enter the "RosevilleEarth" hunt to join in the fun! Answer eco-friendly trivia, capture pictures as part of the photo hunt, and compete for fantastic prizes. 

A couple of years ago, our family was photographed at the Earth Day Festival and our photo was used on their social media and a local magazine, we thought that was pretty neat.  A friend of ours actually saw our picture in the magazine and that's how we found out. 

Here are some pictures from previous years of our family at the Celebrate the Earth Festival.  I hope you are able to go out and enjoy all the free family fun!  Saturday, April 22, 2017.

Thank you for reading if you’ve enjoyed the content you’ve read above please share with your friends. 


Easter is upon us!  My children love to dye Easter Eggs, I enjoy it too.  We often dye too many Easter Eggs, we end up eating egg salad sandwiches the entire Easter week.  I find coloring and dying eggs very therapeutic.  

Over the years we have dyed eggs a number of different styles and ways.  We have purchased the dye kits, we have used Kool-Aid Packets, used crayons and have a lot of fun making the characters that my children are into at the time.  We have made Ninja Turtle Easter Eggs, Angry Bird Eggs, and so many others.

Last year a friend told me about making hard boiled eggs in the oven instead of boiling them.  I tried it and they turned out great.  I think this is a great idea, especially if you need to make a lot of hard boiled eggs.  You can fill two oven racks using your muffin/cupcake pan and in 30 minutes have 48 hard boiled eggs.  Instead of multiple pots of boiling water on the stove top, or if you needed to make a lot you could use both methods at once and have a record number of hard boiled eggs quickly.

When you bake the eggs in the oven they will have brown spots when they come out, once you place the eggs in an ice bath or bowl of cold water, the spots will come off.  

Directions for Baking Hard Boiled Eggs:
Preheat oven to 325-350 degrees. (I used 325 and they were perfect)
Place one egg in each muffin cup.
Bake in oven for 30 minutes
Place eggs in ice bath. I just ran cold water from the sink over them, covered with water let sit for about 10 minutes before peeling to test before I dyed them.

Boiling Hard Boiled Eggs:
Place eggs in a pot in a single layer, cover with water, heat on high till boiling.  Turn off burner once boiling, cover pot with lid and let eggs sit for 13-15 minutes.  Place under cold running water or place in an ice bath.  

Tips for Dyeing Easter Eggs with Kids:
  • Use a disposable table cloth for easy clean-up.
  • If you have nice weather, go outdoors and dye eggs.
  • For younger children, use a whisk or pasta serving spoon to handle the eggs.
  • Timing is everything, plan when they are well rested, and you are not in a hurry.
  • Think outside the box, you can use stickers, googly eyes, scrap paper, scrap fabric, tape to create a pattern, paint, rubber bands to create stripes, your glue gun for older children.  
  • Use a baking drying rack  to let your eggs dry.  Put paper towels or newspaper underneath the rack for easy clean-up.
  • Use egg carton to store dyed eggs in the refrigerator for up to one week.
  • Have fun!  They don't have to be picture perfect, it's just about spending time together and enjoying the moment.
Methods to Dye Easter Eggs:
Egg Dyeing Kits:
You can find kits in a range of prices starting as low as $1.50 and up. We have used glitter kits, marble dye kits, character kits and many more.  Follow the directions on the package.    
Kool-Aid Dyed Eggs:
If you have not used Kool-Aid to dye Easter eggs, I highly recommend it, this is my favorite method.  You do not need vinegar, and the eggs and table will smell delicious.  My kids kept smelling the Kool-Aid dyed eggs, lol.  

For the Kool-Aid method, I used one packet of Kool-Aid mixed with 1 cup of water. I had the eggs soak in the mixture for only 5 minutes and the colors turned out great. 


Food Coloring Method:
Using food coloring drops are easy to do as well.  I used 20 drops of McCormick food coloring for the dark colors pictured below.  Used 1 cup of water and 1 Tablespoon of White Vinegar with the 20 drops of food coloring and had the eggs soak in the mixture for 5 minutes.  

Ombre Easter Eggs:
Want to make get that Ombre style egg with gradients of color?
Use a soda bottle cap to help hold your egg in the glass.
Then mix your color mixture with a little water, not the full amount, pour in a little water at a time, let egg sit for 5 minutes, add more water for next level wait 3 minutes, add more water wait 2 minutes, add more water just for a few seconds.

You can also use food to dye eggs like onion peels, beets, turmeric.  I have not personally used this method, When I read about this method you need to soak the eggs for 2 hours to overnight.  With little kids, they want to see their efforts right away so I will wait to use this method when my children are older.  Here is a great site with directions if you want to try this method check out Mommypotamus click here: Dyeing Eggs Naturally.

I think it would be a great idea to have a girls night and decorate eggs, eat and watch a movie.  Use metallic sharpies and make beautifully decorated eggs.  

Need more Easter Egg Inspiration check out A Night Owl's 100 Easter Egg Ideas, for a variety of egg recipes, decor and craft ideas.

Thank you for reading if you’ve enjoyed the content you’ve read above please share with your friends. 

Tips for Making Easter Eggs

Easter is upon us!  My children love to dye Easter Eggs, I enjoy it too.  We often dye too many Easter Eggs, we end up eating egg salad sandwiches the entire Easter week.  I find coloring and dying eggs very therapeutic.  

Over the years we have dyed eggs a number of different styles and ways.  We have purchased the dye kits, we have used Kool-Aid Packets, used crayons and have a lot of fun making the characters that my children are into at the time.  We have made Ninja Turtle Easter Eggs, Angry Bird Eggs, and so many others.

Last year a friend told me about making hard boiled eggs in the oven instead of boiling them.  I tried it and they turned out great.  I think this is a great idea, especially if you need to make a lot of hard boiled eggs.  You can fill two oven racks using your muffin/cupcake pan and in 30 minutes have 48 hard boiled eggs.  Instead of multiple pots of boiling water on the stove top, or if you needed to make a lot you could use both methods at once and have a record number of hard boiled eggs quickly.

When you bake the eggs in the oven they will have brown spots when they come out, once you place the eggs in an ice bath or bowl of cold water, the spots will come off.  

Directions for Baking Hard Boiled Eggs:
Preheat oven to 325-350 degrees. (I used 325 and they were perfect)
Place one egg in each muffin cup.
Bake in oven for 30 minutes
Place eggs in ice bath. I just ran cold water from the sink over them, covered with water let sit for about 10 minutes before peeling to test before I dyed them.

Boiling Hard Boiled Eggs:
Place eggs in a pot in a single layer, cover with water, heat on high till boiling.  Turn off burner once boiling, cover pot with lid and let eggs sit for 13-15 minutes.  Place under cold running water or place in an ice bath.  

Tips for Dyeing Easter Eggs with Kids:
  • Use a disposable table cloth for easy clean-up.
  • If you have nice weather, go outdoors and dye eggs.
  • For younger children, use a whisk or pasta serving spoon to handle the eggs.
  • Timing is everything, plan when they are well rested, and you are not in a hurry.
  • Think outside the box, you can use stickers, googly eyes, scrap paper, scrap fabric, tape to create a pattern, paint, rubber bands to create stripes, your glue gun for older children.  
  • Use a baking drying rack  to let your eggs dry.  Put paper towels or newspaper underneath the rack for easy clean-up.
  • Use egg carton to store dyed eggs in the refrigerator for up to one week.
  • Have fun!  They don't have to be picture perfect, it's just about spending time together and enjoying the moment.
Methods to Dye Easter Eggs:
Egg Dyeing Kits:
You can find kits in a range of prices starting as low as $1.50 and up. We have used glitter kits, marble dye kits, character kits and many more.  Follow the directions on the package.    
Kool-Aid Dyed Eggs:
If you have not used Kool-Aid to dye Easter eggs, I highly recommend it, this is my favorite method.  You do not need vinegar, and the eggs and table will smell delicious.  My kids kept smelling the Kool-Aid dyed eggs, lol.  

For the Kool-Aid method, I used one packet of Kool-Aid mixed with 1 cup of water. I had the eggs soak in the mixture for only 5 minutes and the colors turned out great. 


Food Coloring Method:
Using food coloring drops are easy to do as well.  I used 20 drops of McCormick food coloring for the dark colors pictured below.  Used 1 cup of water and 1 Tablespoon of White Vinegar with the 20 drops of food coloring and had the eggs soak in the mixture for 5 minutes.  

Ombre Easter Eggs:
Want to make get that Ombre style egg with gradients of color?
Use a soda bottle cap to help hold your egg in the glass.
Then mix your color mixture with a little water, not the full amount, pour in a little water at a time, let egg sit for 5 minutes, add more water for next level wait 3 minutes, add more water wait 2 minutes, add more water just for a few seconds.

You can also use food to dye eggs like onion peels, beets, turmeric.  I have not personally used this method, When I read about this method you need to soak the eggs for 2 hours to overnight.  With little kids, they want to see their efforts right away so I will wait to use this method when my children are older.  Here is a great site with directions if you want to try this method check out Mommypotamus click here: Dyeing Eggs Naturally.

I think it would be a great idea to have a girls night and decorate eggs, eat and watch a movie.  Use metallic sharpies and make beautifully decorated eggs.  

Need more Easter Egg Inspiration check out A Night Owl's 100 Easter Egg Ideas, for a variety of egg recipes, decor and craft ideas.

Thank you for reading if you’ve enjoyed the content you’ve read above please share with your friends. 
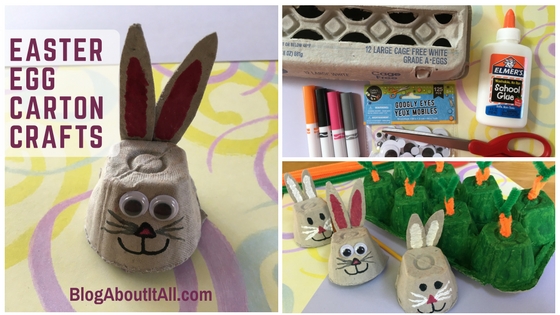
With Easter here and egg dyeing, what are you to do with all those left over egg cartons? You can use the carton to store your hard boiled eggs in the refrigerator for up to one week, but for something more fun...make a bunny!

This is a great way to re-use those egg cartons and have fun with your kids.  This comes in handy when the kids are off school for Spring Break and you are looking for something to keep them busy and not hear those dreaded words "Mom, I'm bored."  

This craft is super easy and very inexpensive.  You probably already have everything you need to create this adorable egg carton bunny, make it your own and have fun!

What you need:
Recycled Egg Carton
Scissors 
Markers or Paint (pink/white/black/gray)
Glue Stick
Googly eyes (optional)
Cotton balls (optional for the tail)

Directions:
Start by cutting out one egg carton cup. You will need to trim around the edges so it sits flat.

Then, cut a square from the carton to make the ears.
Cut out two bunny ears and put some white paint in the middle or use a pink marker.
Draw on the bunny’s face with a black marker and paint the nose with pink paint or marker.

Once the ears are dry, glue them to the back of the egg carton then paint on some white whiskers!
My son came up with the idea to make a carrot for the bunny, we cut it out from the egg carton and used markers to make our carrot. 


You can also make a carrot patch, how fun is this!
What you need:
Recycled Egg Carton
Scissors 
Green Paint 
Pipe Cleaners (Orange & Green)

Directions:
Start by cutting the lid off your recycled egg carton
Then cut the egg carton in half, or to your desired size. 
Paint the egg carton green, and let dry.
Then, poke a hole at the top of each cup (I used a thumbtack) so you can put in your pipe cleaner carrot.
Cut your pipe cleaner's to create a carrot.  
At the top of the orange pipe cleaner make a loop to slide the green pipe cleaner through and also so the pipe cleaner will sit at the top of the egg carton cup.
Once the green pipe cleaner is through your orange loop twist the green and make look like carrot top.

These are great to use for kitchen and garden play.  You could also use the carrots for practicing counting and math.  


Thank you for reading if you've enjoyed the content you've read above please share with your friends. 

Easter Egg Carton Crafts

With Easter here and egg dyeing, what are you to do with all those left over egg cartons? You can use the carton to store your hard boiled eggs in the refrigerator for up to one week, but for something more fun...make a bunny!

This is a great way to re-use those egg cartons and have fun with your kids.  This comes in handy when the kids are off school for Spring Break and you are looking for something to keep them busy and not hear those dreaded words "Mom, I'm bored."  

This craft is super easy and very inexpensive.  You probably already have everything you need to create this adorable egg carton bunny, make it your own and have fun!

What you need:
Recycled Egg Carton
Scissors 
Markers or Paint (pink/white/black/gray)
Glue Stick
Googly eyes (optional)
Cotton balls (optional for the tail)

Directions:
Start by cutting out one egg carton cup. You will need to trim around the edges so it sits flat.

Then, cut a square from the carton to make the ears.
Cut out two bunny ears and put some white paint in the middle or use a pink marker.
Draw on the bunny’s face with a black marker and paint the nose with pink paint or marker.

Once the ears are dry, glue them to the back of the egg carton then paint on some white whiskers!
My son came up with the idea to make a carrot for the bunny, we cut it out from the egg carton and used markers to make our carrot. 


You can also make a carrot patch, how fun is this!
What you need:
Recycled Egg Carton
Scissors 
Green Paint 
Pipe Cleaners (Orange & Green)

Directions:
Start by cutting the lid off your recycled egg carton
Then cut the egg carton in half, or to your desired size. 
Paint the egg carton green, and let dry.
Then, poke a hole at the top of each cup (I used a thumbtack) so you can put in your pipe cleaner carrot.
Cut your pipe cleaner's to create a carrot.  
At the top of the orange pipe cleaner make a loop to slide the green pipe cleaner through and also so the pipe cleaner will sit at the top of the egg carton cup.
Once the green pipe cleaner is through your orange loop twist the green and make look like carrot top.

These are great to use for kitchen and garden play.  You could also use the carrots for practicing counting and math.  


Thank you for reading if you've enjoyed the content you've read above please share with your friends. 
Rice Krispie Treats are one of my favorite treats!  With Easter right around the corner, I wanted to share with you these two easy and cute Easter Rice Krispie Treat Recipes.  I love making fun festive treats for my boys. You can definitely modify these recipes to use what you already have in your pantry or to your tastes.  

I received an e-mail from Kelloggs Rice Krispie with this cute idea for Egg Nests you can see their recipe here. They also have a ton of ideas on their website for more Spring Treats. You can also find similar ideas on Pinterest, to turn these Nests into Easter baskets.
With their Egg Nest recipe it calls for coconut to use as the grass, I was planning on using green frosting instead, then I came across "Edible Grass" at Target when my hubby and I were on a date night (yes I always try and squeeze in a kid free trip to Target or Hobby Lobby on date night, lol) so I decided to use the Edible Grass.  I thought my boys would get a kick out of that. 

I also decided to use my mini muffin pan, bite size things always seem cute, I find the mini muffin size perfect for toddlers. 
MINI EGG NEST RICE KRISPIE TREATS
What you need:
Rice Krispie Cereal
Mini Marshmallows
Green Grass (Edible Grass, Dyed Coconut, or even Frosting)
Eggs (I used Whopper Mini Eggs, you can also use Jelly Beans)

Directions:
Make Rice Krispie Treat Recipe 
I made a smaller batch to fill my 24 mini muffins
Use 3 Tablespoons of Butter and 3 Cups of Mini Marshmallows melted in a pan then add in 3 cups of Rice Krispie Cereal, mix together.  

I used a mini ice cream scoop it was the perfect amount to place in my mini muffin tin. Pressed the mixture in each cup, I used the back of a measuring spoon (Teaspoon size) to help indent the Rice Krispie to form nest you can also use your thumb.

I used scissors to cut up the Edible Grass.  My boys placed the chopped grass in each nest and 2 Whopper Eggs on each nest, they had fun helping.

I love the ways these turned out and so did my boys.  The grass was a big hit with one child it is Apple Flavored, the other two said next time to use frosting.  The Edible Grass does not really add a great taste, but it sure does look cute.  At the bottom of this post I added pictures with nests with frosting per my sons request, lol.

Since I was in the Rice Krispie Easter mood, I also made Easter Egg shaped Rice Krispie Treats.  I used a plastic Easter Egg sprayed with non-stick spray to help mold my treat.  
I also made a smaller batch so I could make multiple colors.
EASTER EGG RICE KRISPIE TREATS
Directions:
Make Rice Krispie Mixture (The 2 Cup Recipe Below makes about 8 eggs in each color)
Use 2 Tablespoons of Butter and 2 Cups of Mini Marshmallows melted in a pan.  
Add in food coloring before the cereal.  
For the Pink I used 4 drops of McCormick Neon Pink Food Coloring
For the Green I used 2 drops of McCormick Neon Green Food Coloring (next time I would use 3-4 drops)
For the Purple I used 2 drops of McCormick Neon Purple Food Coloring
Once Food coloring is mixed in, stir in cereal, mix well.  

I let the mixture cool for about 5 to 10 minutes so the mixture would be easier to handle. You don't want to let it cool too much though or you won't be able to form the eggs.
I sprayed a plastic Easter Egg with non-stick cooking spray and then filled the egg to form the egg shape.  It was very easy and I love the way they turned out.

Thank you for reading if you’ve enjoyed the content you’ve read above please share with your friends. 


Easter Rice Krispie Treats

Rice Krispie Treats are one of my favorite treats!  With Easter right around the corner, I wanted to share with you these two easy and cute Easter Rice Krispie Treat Recipes.  I love making fun festive treats for my boys. You can definitely modify these recipes to use what you already have in your pantry or to your tastes.  

I received an e-mail from Kelloggs Rice Krispie with this cute idea for Egg Nests you can see their recipe here. They also have a ton of ideas on their website for more Spring Treats. You can also find similar ideas on Pinterest, to turn these Nests into Easter baskets.
With their Egg Nest recipe it calls for coconut to use as the grass, I was planning on using green frosting instead, then I came across "Edible Grass" at Target when my hubby and I were on a date night (yes I always try and squeeze in a kid free trip to Target or Hobby Lobby on date night, lol) so I decided to use the Edible Grass.  I thought my boys would get a kick out of that. 

I also decided to use my mini muffin pan, bite size things always seem cute, I find the mini muffin size perfect for toddlers. 
MINI EGG NEST RICE KRISPIE TREATS
What you need:
Rice Krispie Cereal
Mini Marshmallows
Green Grass (Edible Grass, Dyed Coconut, or even Frosting)
Eggs (I used Whopper Mini Eggs, you can also use Jelly Beans)

Directions:
Make Rice Krispie Treat Recipe 
I made a smaller batch to fill my 24 mini muffins
Use 3 Tablespoons of Butter and 3 Cups of Mini Marshmallows melted in a pan then add in 3 cups of Rice Krispie Cereal, mix together.  

I used a mini ice cream scoop it was the perfect amount to place in my mini muffin tin. Pressed the mixture in each cup, I used the back of a measuring spoon (Teaspoon size) to help indent the Rice Krispie to form nest you can also use your thumb.

I used scissors to cut up the Edible Grass.  My boys placed the chopped grass in each nest and 2 Whopper Eggs on each nest, they had fun helping.

I love the ways these turned out and so did my boys.  The grass was a big hit with one child it is Apple Flavored, the other two said next time to use frosting.  The Edible Grass does not really add a great taste, but it sure does look cute.  At the bottom of this post I added pictures with nests with frosting per my sons request, lol.

Since I was in the Rice Krispie Easter mood, I also made Easter Egg shaped Rice Krispie Treats.  I used a plastic Easter Egg sprayed with non-stick spray to help mold my treat.  
I also made a smaller batch so I could make multiple colors.
EASTER EGG RICE KRISPIE TREATS
Directions:
Make Rice Krispie Mixture (The 2 Cup Recipe Below makes about 8 eggs in each color)
Use 2 Tablespoons of Butter and 2 Cups of Mini Marshmallows melted in a pan.  
Add in food coloring before the cereal.  
For the Pink I used 4 drops of McCormick Neon Pink Food Coloring
For the Green I used 2 drops of McCormick Neon Green Food Coloring (next time I would use 3-4 drops)
For the Purple I used 2 drops of McCormick Neon Purple Food Coloring
Once Food coloring is mixed in, stir in cereal, mix well.  

I let the mixture cool for about 5 to 10 minutes so the mixture would be easier to handle. You don't want to let it cool too much though or you won't be able to form the eggs.
I sprayed a plastic Easter Egg with non-stick cooking spray and then filled the egg to form the egg shape.  It was very easy and I love the way they turned out.

Thank you for reading if you’ve enjoyed the content you’ve read above please share with your friends. 


Latest Videos

@instagram